
When you are teaching a complex skill with lots of steps (like how to do dishes, take a shower, bake cookies, or wash hands properly), providing a “task analysis” or checklist can be helpful. If you want to create the BEST checklist possible to help them, follow these simple directions!
Important note: links in this blog post are affiliate links. If you choose to click on and buy one of these products, ABH may get a small commission. We use these commissions to fund our low and no cost options. Thank you for your support!
Lets talk task analysis – the best checklists for teaching!
A task analysis is a list of things you need to do to get something done. We go through automatic lists all day, every day. For example, you could describe the act of washing a dish in just a few steps like:
- Get it soapy
- Rinse it
- Dry it
Get detailed with each step:
- Look at the dish to be cleaned
- Decide what tool to use to clean it (sponge or scrub brush)
- Turn on the water and let it get warm
- Put a small amount of soap on the tool…etc.
Or go very deep into every teeny-tiny little step
- Open your eyes
- Orient yourself toward the sink by standing in front of it within six inches
- Orient your eyes to the dish
- Blink your eyes
- Turn on the water so that the hot and cold are both at 50% capacity
- Blink your eyes again…etc.
As you can see, you can be too brief and lose specific things that matter or get so nit-picky with every little detail that nothing makes sense any more. Here are eight simple steps to help you create more effective check list task analyses! You’ll be a pro at making the best check lists for teaching in no time 🙂
1. Set up for success before you start
Before you even start your checklist, think about the prompts that may be needed to help the individual be successful when they are completing the actions on their own. What can you do to make things easier to complete?
For example, you may use a sharpie to draw an arrow in the shower where an appropriate starting temperature would be. That way, when they turn it on and are warming it up, it’s not so hot that they will burn themselves but it’s not set so cool that it’ll take a long time to warm up.
Here are some other helpful things you might set up ahead of time:
- For washing dishes, you might have a step stool ready to go
- For putting away toys, you might label containers with pictures of the objects that go in them
- For cleaning up after a toileting accident, you may have a special hamper in the bathroom so that soiled clothes aren’t carried around the house
- For showering, you might put the towel hanger lower so your child can reach it on their own
2. get [a little] too detailed
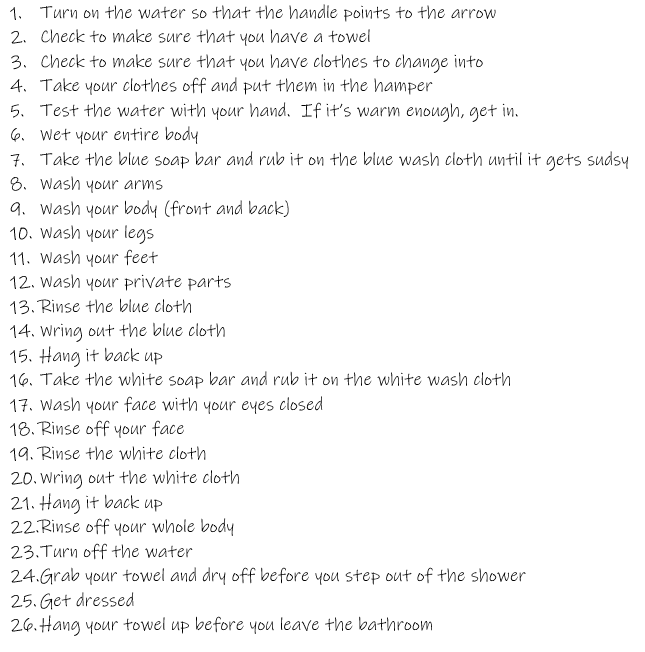
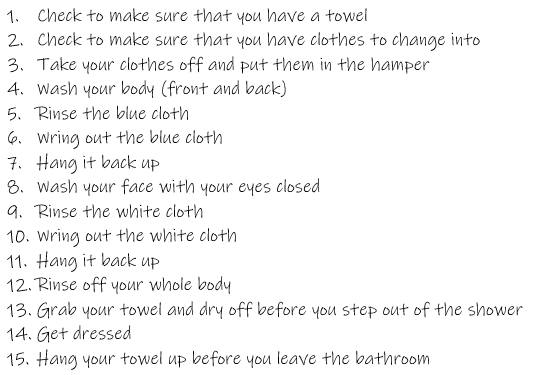
I know we just talked about how too much detail can make a list impossible to follow and far too stringent. Don’t go crazy here, but put in more details than you think may be necessary to begin. Let’s use showering as an example. If you are working to help someone take a shower on their own and want to provide them a checklist, start by being just a little too detailed. That may look like the one to the right —>
Whew…that’s a long and possibly unhelpful list. This is the best place to start, I promise! Don’t worry, the next step will pare it down and we will get to the best check list for teaching.
3. Grab the highlighters
Depending on your child’s specific needs, skills, and challenges, different steps and parts of the list will be more important. Go ahead and grab two highlighters. Choose one as the “MUST HAVE” highlighter and the other as the “PROBABLY IMPORTANT” highlighter. Pick up you MUST HAVE color and go through the list.
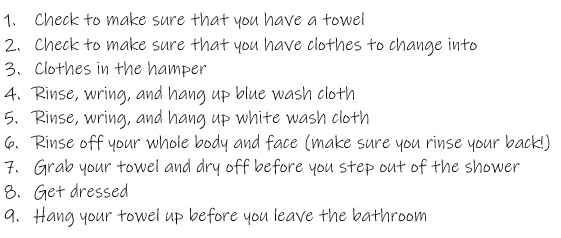
I’m going to go through the list thinking about a child who is about 7
years old and always leaves their towels everywhere but on the hangers
and doesn’t rinse their back well enough. Here is what my list looks
like after I go through the MUST HAVES and highlight them yellow:
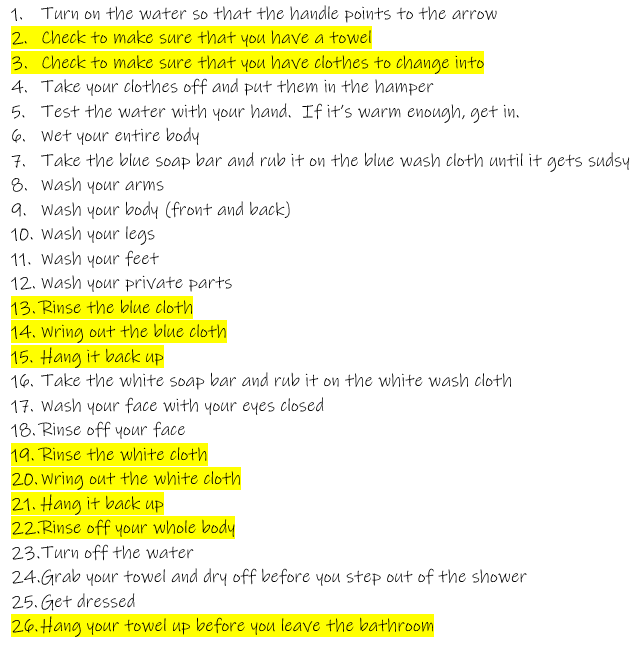
You may wonder why I highlighted number 3 if the big issues I’m trying to target here are cleaning up the towel and rinsing everything. This is one of those things that can fall through the cracks if you don’t overdo the list to begin with: if I make sure that they have clothes to change into, they don’t have to leave the bathroom to get dressed. Which means the towel doesn’t have to leave the bathroom. Which means that it is very unlikely that it’ll end up wadded up behind the bed. Simple but genius solutions will come out of this process!
This is also a good time to think about step one again, setting them up for success. If the towel is always in the same place and the clothes to change into are always in the same place, it’s harder to forget them. Assign those places!
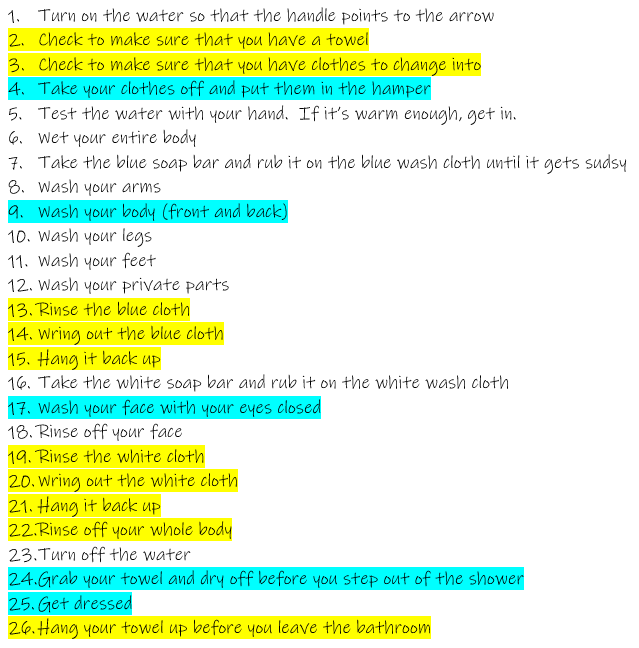
Ok, now that you have your MUST HAVES taken care of, go through with the other color and do your PROBABLY IMPORTANTs. These you may refine or combine later, but will likely be needed for success. You may end up deleting them later too, but for now they seem important. Mine for this situation look like this:
Alright, now we have a much more doable list to work with that hits that things that your child needs help with the most. Here it is once we just take the highlighted bits and delete the rest of the extra lines:
4. Combine and refine
Knowing the child that you are helping, you can consider combining steps or refining/expanding on them to fit their needs. This can mean combining steps or adding details to steps that you think that they will need to succeed. It can also mean changing the order, adding in helpful hints (remember those “set up for success” things we talked about? Mention them in the steps), or otherwise making things more clear.
5. make it visual
Adding pictures can make a huge difference, especially if someone is limited in their reading skills. You may not end up using any words or few words in the end, the pictures may be enough. Think about the person you are working to help and tailor your approach to their needs—there is no “best” way for all, just the best way for each individual. This can mean having the written list with pictures along side, just pictures, or just pictures where needed. Here is an example, we made it easy for you to download:
6. Bring in a tester
Now that you have your check list, bring in someone who was not a part of making it but knows the individual that you are providing the list to. That way they know the intricacies of the child’s strengths and weaknesses but are not invested in having the list be right. Now, have them go through the list as if they were the child. Actually go through it. Like, go take a shower and follow the list. And be brutal about it! They should be looking for the flaws so that you can fix them now before you present and start to teach.
7. Consider using behavior skills training (BST)
Behavior Skills Training (or BST) is a research-backed way of teaching new skills. It’s super simple, just three steps:
Step one of BST: Talk about what you are working on
For checklists, that will mean going over the list together and talking about what each step means. It may mean looking at the supplies together or walking around to applicable areas while you go over the steps.
Step two of BST: Model every step
Now go through and show exactly what each step means, in order. You may be tempted to combine these steps, but avoid this temptation: repetition is the basis of learning. It can be helpful to have them tell you what is on the list and then you model what to do. For things like showering, you can literally model the behavior (e.g., keep your clothes on and go through general motions) without actually engaging in the full behavior.
Step three of BST: Practice and give feedback
Practice time! Now it’s time for them to practice with your support. This means giving them feedback and helping them as necessary. Continue with this step until they have it 100% on their own!
Pro tip: There are several ways to fade out your help including forward chaining, backward chaining, and total task chaining. If needed, you can use stickers to mark when a step is done. This may help with motivation too.
Not sure which to use? We are here to help! Schedule a free Discovery Call today!
For forward chaining, you let them do the first step, then help with the rest. Then they do the first two and you help with the rest. Then the first three…and so on until they are doing it all on their own. This is great for things like tying shoes, where the steps tend to get harder as you go.
For backward chaining, it’s the opposite. You help them until the last step. Then they do the last two steps. Then they do the last three…and so on until they are doing it all on their own. This is great for things like making a meal, where the easiest steps (serving onto a plate, bringing to the table) tend to be the easiest.
Total task chaining is used when random steps are hard. A common example of this is baking cookies. While adding the flour and mixing in the chocolate chips are fairly easy, cracking the eggs cleanly and putting the cookies into the oven safely are not. In this case, you would allow them to do certain steps totally on their own and continue to help with the more difficult steps.
8. Last but not least: modify as needed
Even with all of this, you may find that you need to adjust your check list along the way. That’s okay! The needs of your child will change, you will realize that you missed something important, or they will grow out of the list entirely. This is all normal and fine.
What do you think about this? Do you like our steps? What kinds of checklists do you need help creating? How did they work for you? Let us know in the comments!